How Do I Copy a DVD? A Creator’s Guide for 2026
You’ve got a finished DVD on your desk, a deadline coming up, and a simple question that turns messy fast: how do i copy a dvd without ending up with coasters, broken menus, or a file that only works on one laptop.
That question usually comes from creators, not hobby tinkerers. A band needs discs for the merch table. A church needs sermon DVDs for members who still use standalone players. A filmmaker needs a safe backup of a festival screener. In all three cases, “copying” can mean very different things, and the right workflow depends on what you need at the end: a playable digital file, a stack of physical discs, or both.
Your Master DVDs and the Two Paths to Copying
A finished master DVD can serve two very different jobs. It can be the source for a digital file you archive, upload, or hand off to a client. Or it can be the source for more discs that need to play properly in living room DVD players, church classrooms, and merch-table setups.
Those are different workflows, and they fail in different ways.
Rip for archive and digital delivery
Use the rip path when the end goal is a file. That usually means backing up a sermon series, posting a concert program online, sending a screening copy to a programmer, or keeping a clean digital archive in case the physical master gets scratched.
For that job, dragging VIDEO_TS files to a folder is rarely enough. DVD video is authored as a disc format, not packaged like a modern delivery file. A proper rip pulls the video off the disc, then converts it into something practical such as MP4 or MKV for playback on current devices.
The trade-off is simple. You gain convenience and easier sharing, but you may leave behind disc-specific features such as menus and some chapter behavior, depending on how you convert it.
Duplicate for physical distribution
Use the duplication path when the disc itself is the product. That matters for creators serving audiences who still rely on standalone DVD players, including churches, community groups, and artists selling event recordings after a live show.
In that case, the goal is not just to copy video content. The goal is to preserve the authored DVD structure so the menu works, the chapters land where they should, and the disc behaves like the master in as many players as possible. That usually means creating a disc image, then burning from that image rather than copying random folders by hand.
A short-run job lives or dies on reliability. One bad burn out of ten is annoying. One bad burn out of fifty can derail a Sunday handout, a screening submission, or a merch order.
Practical rule: If people will watch on a DVD player, copy the disc as a disc. If they will watch on computers, phones, or smart TVs, make a digital file for that purpose.
Creators usually need to choose based on the audience, not the tool sitting on the laptop. A filmmaker may need one preserved master image for future disc runs and one MP4 for festival delivery. A band may want a few saleable DVDs now, plus a digital backup in case they need another short run later. That is the core decision behind how do i copy a dvd. You are choosing the output, the playback environment, and the margin for error.
Choosing the Right Free Tools for the Job
A failed DVD job often starts with the wrong software choice. Someone tries to make saleable discs with a video converter, or tries to pull a usable MP4 out of a disc-burning app, and the result is wasted blanks, inconsistent playback, or a file that solves the wrong problem.

For creators managing their own short runs, the tool matters because the workflow matters. A church archiving sermons has different needs than a band selling concert DVDs after a show. A filmmaker sending preview discs needs repeatable burns and clean playback checks, not just a video file that looks fine on one laptop.
A simple tool comparison
| Tool | Best use | What it handles well | Where it falls short |
|---|---|---|---|
| HandBrake | Rip DVD video to MP4 or MKV | Good for making usable digital files for computers, tablets, and phones | Not the tool for making a physical 1-to-1 disc copy |
| ImgBurn | Create ISO files and burn discs | Good for disc-image workflows and controlled burns on Windows | Not a video converter |
| VLC | Playback and basic testing | Useful for checking whether files or discs actually play | Limited as a production workflow |
When HandBrake is the right choice
Use HandBrake when the deliverable is a file. It is a practical option for archiving a sermon series to a hard drive, sending a rehearsal cut to a client, or keeping a backup copy of your own authored content in MP4 or MKV form.
It also helps to set expectations correctly. HandBrake is built to extract video and audio into a new file format. It does not preserve the full authored DVD structure for duplication jobs, so it is the wrong choice if your audience still needs a disc with menus and standard DVD player behavior.
Earlier, we noted why DVD copying is often more involved than dragging files off a disc. If a disc includes encryption, access restrictions, or read issues, ordinary file transfer may fail even before you get to quality questions.
When ImgBurn makes more sense
ImgBurn fits the job when the disc itself is the product. That is common with event DVDs, ministry handouts, training discs, and merch-table sales where people still expect a disc to load properly in a living-room player.
An image-based workflow gives you consistency across the run. You create one master image, test it, and burn each copy from the same source. That reduces the chance of one disc having missing files, altered folder structure, or odd playback behavior caused by manual copying.
Three practical advantages matter in short runs:
- Menus and chapters stay with the disc structure: You keep the authored layout intact.
- Verification is easier: You can check the image before committing a stack of blanks.
- Repeat jobs are simpler: If you need ten more copies next month, you start from the same master image.
Where VLC fits
VLC is the test bench player. Use it to confirm that a rip opens, audio is present, chapters respond, and a burned disc at least behaves correctly on a computer before you move to hardware player testing.
That last part saves time.
In duplication work, plenty of problems show up after the burn. Audio drift, the wrong title playing first, a dead menu button, or a file that opens on a laptop but fails on an older DVD player. VLC will not replace proper testing on standalone players, but it is a fast first check before you burn more copies.
A reliable free-tool setup usually includes all three. One tool to create a digital file, one tool to build and burn disc images, and one tool to test what you made.
How to Rip Your DVD to a Digital File
When someone says they want to copy a DVD to a computer, this is usually what they mean. They want a file they can store, upload, or duplicate later.

Start with the disc and the drive
Insert the DVD and open HandBrake. If your computer doesn’t have an optical drive, use an external USB DVD drive. Let the software scan the disc fully before changing anything.
If the disc was authored cleanly and isn’t protected, that first scan is usually straightforward. If the software can’t read it, don’t assume the program is broken. The issue may be the disc itself.
According to VideoProc’s explanation of DVD-to-computer workflows, the technical step is ripping, not ordinary file copying, and common failure points include scratches, dirt, read errors, and messages like “no valid source found” or “no title detected.” That same guidance notes that cleaning the disc surface and retrying is a standard first recovery step when the disc is physically damaged.
Pick the right title
Once HandBrake scans the disc, you’ll usually see multiple titles. That confuses first-time users, but it’s normal. DVDs often contain menus, intros, extras, and alternate segments.
Use this quick logic:
- Choose the longest title if you’re after the main program.
- Preview chapters if the disc includes bonus content and you only want one segment.
- Check audio tracks before you start, especially if the disc has multiple mixes or commentary.
For a concert DVD, the longest title is often the full show. For a sermon archive disc, there may be separate titles for each message. For a filmmaker’s screener, there might be one main feature plus trailers.
Choose output with purpose
The two most practical output formats are MP4 and MKV. They’re common because they reduce storage needs and improve compatibility across devices and major platforms, and DVD-copy workflows today often target those formats instead of staying in disc-only form, as described in this workflow overview on modern DVD copying and conversion.
Use MP4 when you want broad playback compatibility. Use MKV when you want flexibility with tracks and don’t mind a format that some older devices handle less gracefully.
A clean creator workflow looks like this:
- Archive copy: Save a high-quality file to a hard drive.
- Sharing copy: Make a version that’s easier to upload or hand off.
- Label clearly: Include project name, version, and date in the filename.
If you don’t label your exported file clearly, you’ll eventually burn the wrong master. That’s not theory. That’s shop-floor reality.
Export and verify
Set the save location before you hit start. Then let the encode finish completely. Don’t judge the result by file size alone. Open it in VLC and scrub through several spots.
Check these three things:
- Beginning: Does the file start where you expect?
- Middle: Is audio still in sync?
- End: Does it finish cleanly without glitches?
If that file passes, you’ve got a usable digital master. That may be enough for online distribution, backups, USB delivery, or future re-authoring.
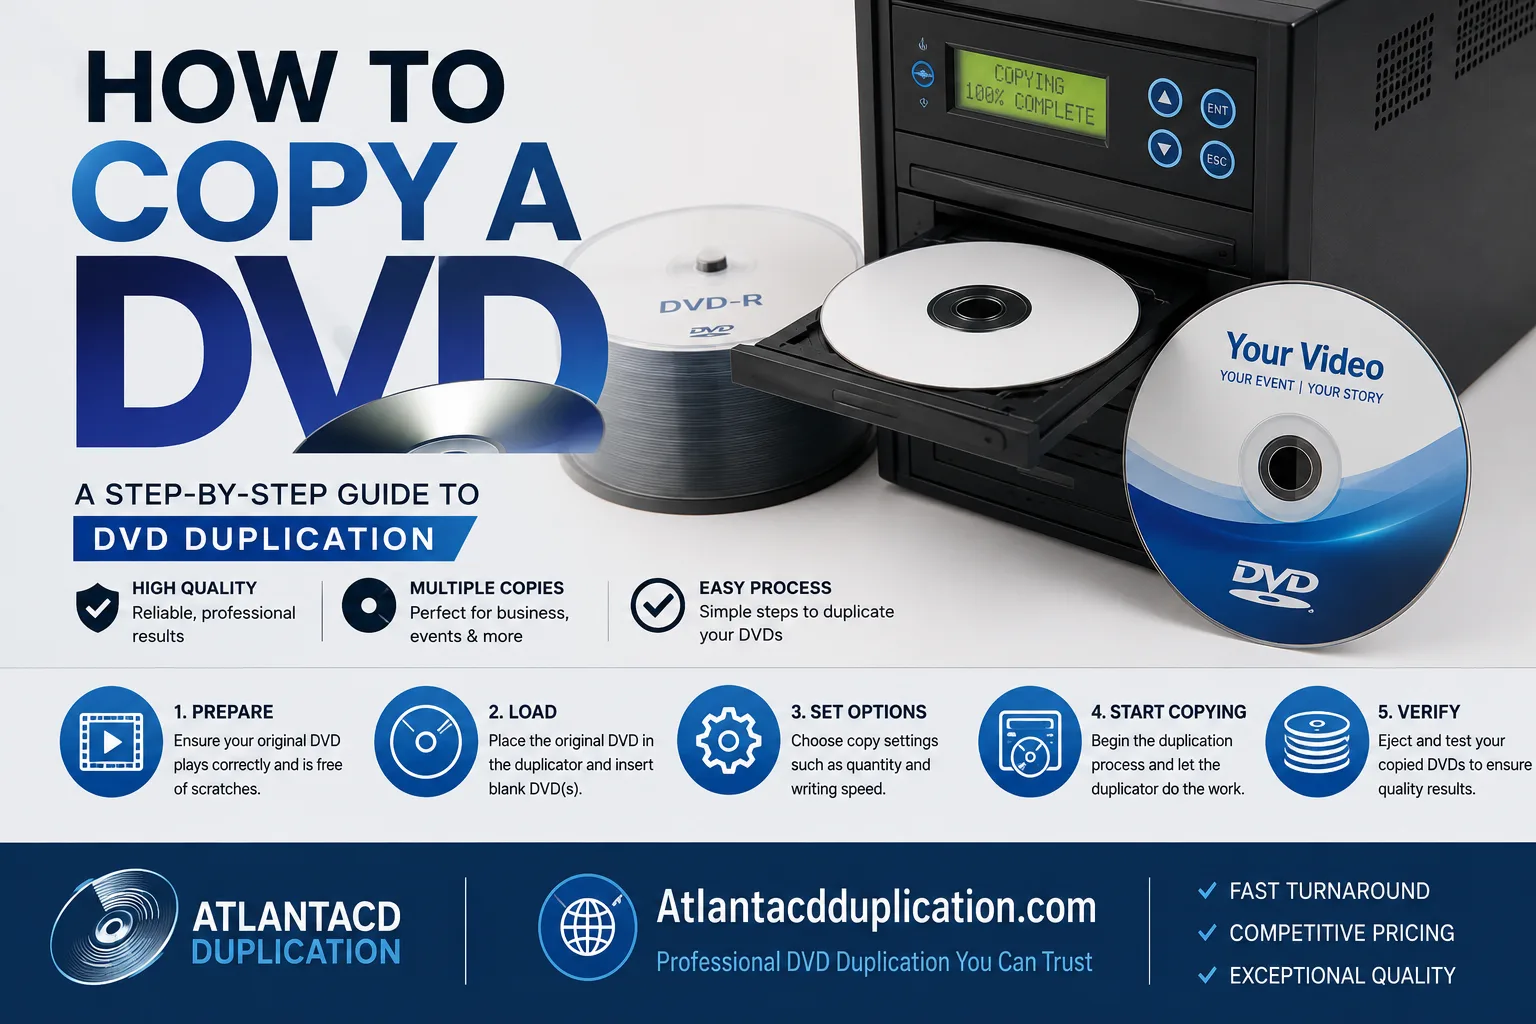
Creating a Perfect 1-to-1 Disc Copy with an ISO Image
If the digital file route is for archive and convenience, the ISO route is for dependable physical duplication. This is the method that makes sense when the disc itself is the product.

Why ISO beats drag-and-drop
An ISO is a single image file that represents the whole disc. It’s the closest thing to taking a snapshot of the authored DVD. That matters because a playable DVD isn’t just “video files on a disc.” It’s structure, layout, and formatting.
For the most reliable disc-to-disc workflow, industry guidance is to author the DVD on the hard drive first, then burn the finished VIDEO_TS folders to blank media using dedicated DVD burning software, because that reduces variables and gives the lowest reject rate and highest player-compatibility rate, as explained in Primera’s guidance on copying and creating DVDs.
Two practical routes
If you already have a finished master DVD, create an ISO from it. If you still have the authored project on your computer, create or verify the VIDEO_TS folder first, then burn from that clean master.
Here’s the difference:
| Situation | Better method |
|---|---|
| You only have the finished disc | Read the disc and create an ISO image |
| You still have the authored DVD folders | Burn from the verified VIDEO_TS structure |
| You need multiple short-run copies | Build one clean image or folder set, then burn all copies from that |
A dependable burn workflow
On Windows, ImgBurn is a common choice for this. On macOS, Disk Utility can be part of the process for image handling, though many creators still prefer dedicated burning software when they care about playback consistency.
Use this sequence:
- Create the image or verify the VIDEO_TS folder
- Check the structure before burning
- Burn to quality blank media
- Enable verification after burn if your software supports it
- Test the finished disc in more than one player
That last step matters. Computer playback is helpful, but it doesn’t prove that an older living-room player, ministry DVD deck, or venue machine will behave the same way.
What usually fails in short runs
The weak point in DIY duplication is often not the software. It’s the process discipline. People rush, switch media brands mid-job, skip verification, or burn from files copied casually off an original disc.
That’s why I tell creators to think like a duplicator for a minute.
- Keep one true master: Don’t keep rebuilding from random copies.
- Burn from the same verified source: ISO or approved VIDEO_TS only.
- Test early: Don’t burn a stack before testing one disc properly.
A DVD is not a normal data disc. If you treat it like one, you can end up with a disc that looks full but won’t play where it matters.
For bands, churches, and indie filmmakers doing short runs, this ISO-first mindset saves time and avoids the classic disaster of discovering the discs fail after labels are already printed.
Troubleshooting Copy Protection and Common Errors
A common short-run failure starts like this. The disc played fine at rehearsal or in the office, then the copy stalls in a church DVD deck, a green room player, or an older living-room unit right before the event. At that point, the problem is no longer “can I copy this DVD.” It is whether the disc can be trusted in the places your audience will use it.

What usually causes the failure
In practice, the trouble usually falls into two buckets.
- Disc read problems: fingerprints, light scratches, poor burns, or a drive that struggles to read that specific disc
- DVD authoring or protection problems: region coding, copy protection, broken title structure, or software that cannot correctly read the disc
A lot of online guides stay focused on ripping steps and downloader-style tools. That misses the core question many creators have. Are you trying to preserve your own master, or are you dealing with a protected commercial disc? That distinction matters for both legality and workflow. It also shapes what tool behavior you should expect, as noted in this review of search results around DVD copying.
What to check before blaming the software
Start with the disc and the drive.
Clean the disc from the center outward with a soft cloth. Then try a different optical drive if one is available. I have seen one drive fail repeatedly on a disc that another drive read without complaint.
Next, test simple playback. If VLC or your standard player cannot open the disc reliably, the problem may be the disc itself, not your copy settings.
If the disc is your own authored master, stop working from a burned copy if you can avoid it. Go back to the original project export, the approved VIDEO_TS folder, or the ISO you created from the known-good source. That is the safer recovery path for bands selling merch discs, churches handing out sermon series, and filmmakers doing festival or screening copies.
Copy protection changes the answer
If the disc has copy protection, technical advice and legal advice split apart fast. A creator archiving their own program is in a different position from someone trying to duplicate a studio release. Laws differ by location, so check the rules that apply before trying to remove or bypass protection.
From a production standpoint, the better habit is simple. Keep a digital master of your own content on a hard drive or backed-up storage, not just one physical disc on a shelf. Physical discs fail, get scratched, or go missing. A clean file-based master gives you a repeatable source when you need another short run later.
When to Skip DIY and Use Professional Duplication
Release week is a bad time to discover your home-burned DVDs only play reliably in the drive that made them. I have seen that happen with concert discs, sermon series, and indie film screeners that looked fine on a desk and started failing once they reached older set-top players.
DIY still has a place. It works for approval copies, archive discs, and very small hand-burned runs when you can check every disc yourself. The math changes once the DVD is part of the product you are selling, handing out, or putting on a merch table. At that point, consistency matters as much as getting the video onto a disc.
A short run turns into production work fast. You are no longer just copying content. You are managing burn reliability, print alignment, case assembly, and final spot checks.
Signs DIY is no longer saving you time
DIY usually stops making sense in a few predictable situations:
- You are burning discs one at a time: Fine for proofs. Slow and error-prone for a public release.
- You need the discs to match across the run: Menu behavior, playback, print, and labeling need to stay consistent from copy to copy.
- You also need packaging: Amaray cases, sleeves, inserts, and shrink wrapping add labor that has nothing to do with authoring.
- You are sending discs to supporters, members, or customers: A failed playback becomes a customer service problem, not just a technical one.
- You need both discs and digital delivery: Many creators now need a physical item for events or sales, plus downloadable or streaming access for viewers who no longer use a DVD player.
That last point gets missed in a lot of copy guides. For musicians, churches, and filmmakers, the main decision is often format strategy, not just duplication. Some projects need a DVD because the audience still expects a physical copy. Others are better served by keeping the disc as a merch or donor item and treating the digital file as the primary viewing format.
What a professional run changes
A duplication house gives you a controlled workflow from approved master to finished units. That means verified source files, repeatable disc burning, printed faces that line up properly, packaging assembled the same way each time, and a batch that is built to go out the door.
That matters for short runs. If you are making 25, 50, or 100 copies, a bad process wastes a large share of the job very quickly. If even a few discs fail, the time spent reburning, reprinting, and repacking can wipe out any savings from doing it yourself.
Atlanta Disc is one example of that kind of service for short-run DVD duplication and packaging. For creators releasing a live show, sermon archive, training program, or indie feature, that support is often less about convenience and more about quality control.
A practical rule is simple. Use DIY for test discs, internal copies, and tiny runs you can personally verify. Use professional duplication when the disc represents your brand, your event, or something people paid to receive.
If you’ve got a DVD project that needs to move from master disc to finished product, Atlanta Disc can help with short-run duplication, packaging, and print support so you’re not spending your release week babysitting burners.